
White to Play and Win
Published in Chess Puzzles
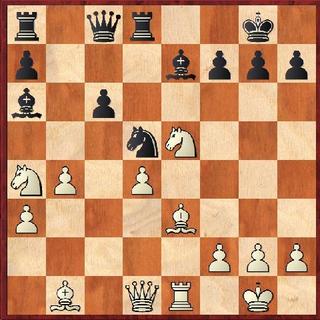
In this game, Kracunov-Kirov, 1963, White launches a decisive kingside attack. This position is good for a weekend sit-down at your chessboard. There are lots of different variations as Black tries to wriggle free. See how you do.
Solution:
White starts out with a typical sacrifice that accomplishes several things: it draws the king out for an important follow-up check; it starts the destruction of the castled position pawn wall. 1.Bxh7+ Kxh7 [Alternatives are not really better, but they are instructive: 1...Kf8 2.Qh5 g6 (2...Qe6 3.Bf5 Qf6 4.Qh8#) 3.Bh6+ Ke8 4.Qxg6 fxg6 (4...Qe6 5.Qg8+) 5.Bxg6#] 2.Qh5+ Kg8 3.Qxf7+ Kh7 [ Black would only have prolonged things with 3...Kh8 4.Bh6 Rg8 5.Qh5 Rf8 6.Ng6+ Kg8 7.Rxe7 gxh6 8.Qxh6 Nxe7 9.Nxe7+ Kf7 10.Nxc8] Now comes the really decisive move! White offers another bishop. Its secret is that it's a forcing move. White threatens mate on the move on g7, so Black has to drop every thought about bringing another piece over to defend and deal with the threat. 4.Bh6 Bf6 [4...Kxh6 5.Qg6#; 4...Rg8 5.Qg6+ Kh8 6.Nf7#] 5.Bxg7 Bxg7 6.Re4 This "rook lift" caused Black to resign as mate follows. For novices at the game it shows that White had castled and played his rook later to e1 so he could move his rook up (sometimes to e3) to e4 in order to swing it over to the g- or h- file to join the attack. When you castle and then play Re1 you don't know which square the rook is going to, e3 or e4, but knowing that is a possibility is what we call strategy. Tactics are when you know exactly what move you're going to make next.
Send questions and comments to PTamburro@aol.com.


Comments